
How to Use Attribute Forms in QGIS
What you'll learn
- The basics of using QGIS attribute forms
- How to set up dropdown lists and checkboxes
- How to attach files such as images to attributes
Recommended for
- Anyone who wants to make data entry in QGIS more efficient
- Anyone who wants to reduce mistakes when entering attribute information
- Anyone who wants to add images as attribute information
Introduction
When you enter attribute values in QGIS, you usually type text or numbers directly. However, manual entry is prone to typing mistakes, which can affect the quality of your data.

To solve this problem, you can use attribute forms to set up dropdown lists, checkboxes, and numeric ranges. You can also attach files such as images, which greatly improves the efficiency and accuracy of data entry.
This article explains in detail how to use attribute forms to configure specific types of fields.
Open the attribute form
To view the attribute form, first open the Layer Properties dialog of a vector layer.

In Layer Properties, click the Attributes Form tab to open the attribute form settings.

The left side lists the fields of the layer. Select a field in the Fields list, and the settings for that field appear on the right. In this example, you can see that the text field uses the Text Edit widget type.

Click the widget type menu to see the list of widget types. Depending on the data type of the field, some widget types are available and others are not.

Create a dropdown list field
With a dropdown list, you can prepare the choices for an attribute value in advance, so users can enter values easily and accurately just by clicking.

Add a text column to the layer
The following example adds a new field (continent) for entering continent names to a layer of the world's countries, and then sets up a dropdown list for it.
First, switch the layer to edit mode and add a Text (string) column.

For more on adding fields, see the following article.
Set up a dropdown list in the attribute form
Next, open the attribute form from Layer Properties. Select the field you just created (continent) in the Fields list on the left, and select Value Map as the Widget Type.

The Value Map settings appear below the Widget Type menu. Enter the values for the dropdown list in the table.

Here you can also click the Load Data from Layer button to load the existing values of a field in a layer, or the Load Data from CSV File button to load values from a CSV file.

When you finish, click OK.
Open the attribute table of the layer and, in edit mode, click the field. You can now enter values from the dropdown list.

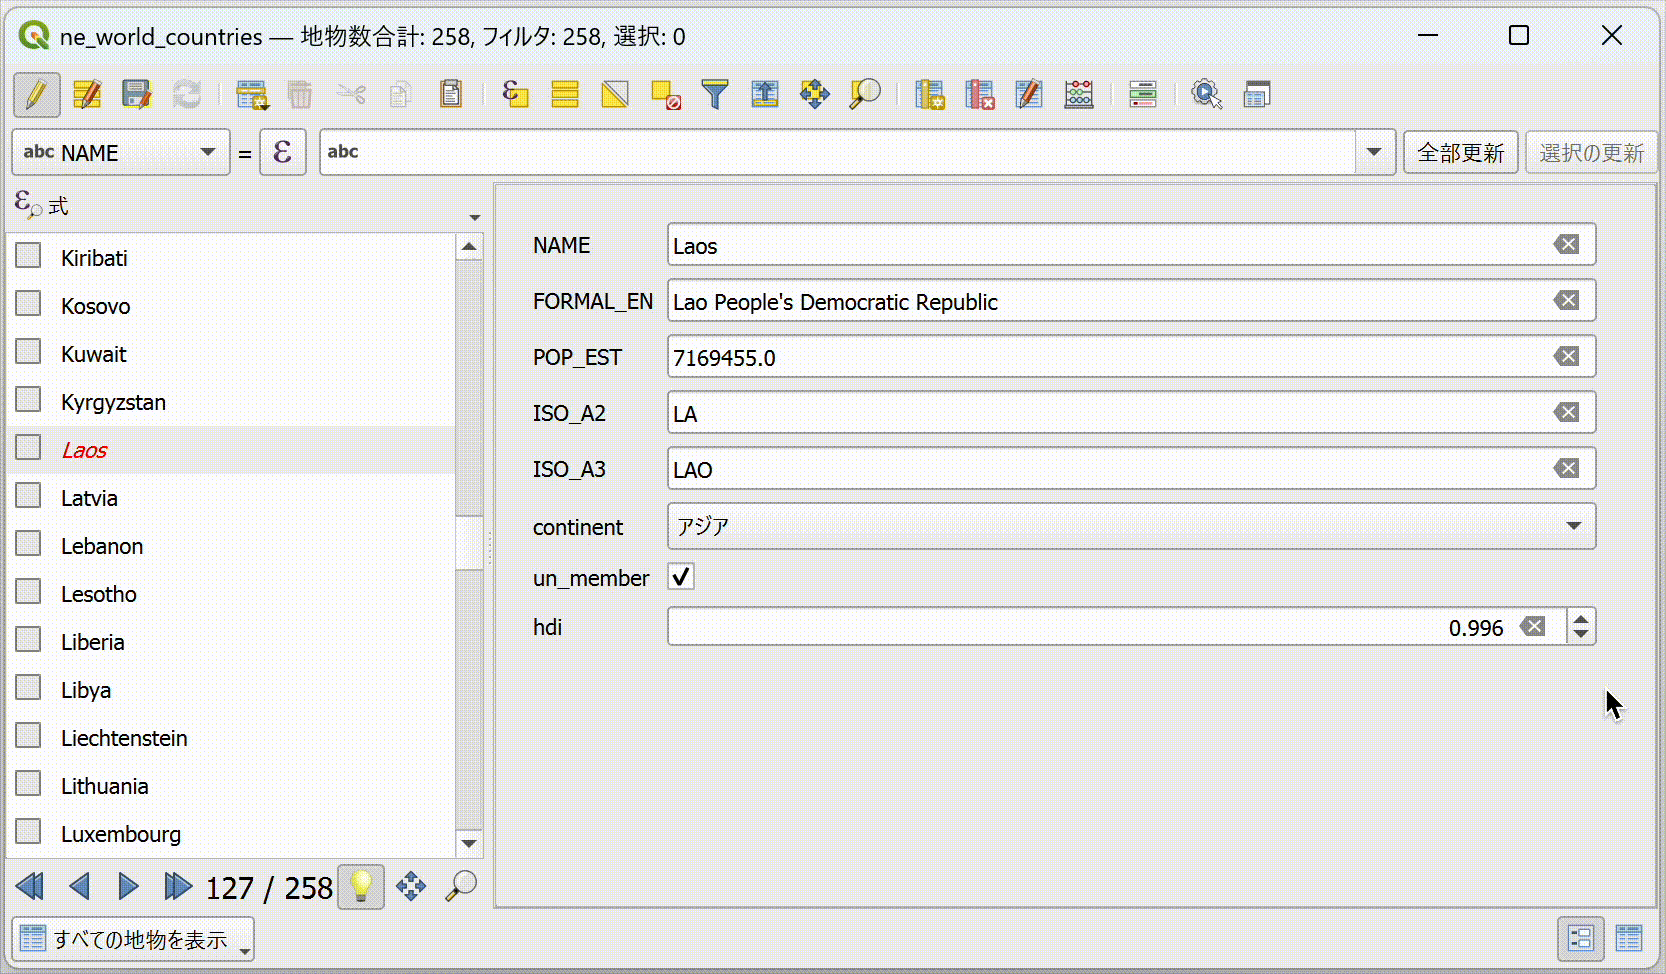
You can also click the Switch to form view button at the bottom right of the Attribute Table window to display the features as a form. The form view also lets you select a value from the dropdown list with ease.

Create a checkbox field
A checkbox field is very efficient because you can switch it on or off with a click. With text input, you have to type values such as true and false, or 1 and 0, by hand. With a checkbox, a single click completes the entry.

Add a text column to the layer
The following example adds a field (un_member) for entering United Nations membership status to a layer of the world's countries, and then sets up a checkbox for it.
First, switch the layer to edit mode and add a Boolean column.

Set up a checkbox in the attribute form
Next, open the attribute form from Layer Properties as before and do the following.
- In the Fields list on the left, select the Boolean field you just created (
un_member). - Select Checkbox from the Widget Type menu.
- When you finish, click OK.

Open the attribute table to check the setting. The field now shows checkboxes, and one click switches the state.
Create a numeric range field
With the range widget type, you can set a minimum value, a maximum value, and a step. This helps prevent entry mistakes.
Add a numeric column to the layer
This example adds a Human Development Index (HDI) field to the world's countries layer. The values range from 0 to 1, and you can enter them in increments of 0.001.
First, switch the layer to edit mode and add a Decimal Number (real) column.

Set up a range in the attribute form
Open the attribute form from Layer Properties and do the following.
- In the Fields list on the left, select the decimal number field you just created (
hdi). - Select Range from the Widget Type menu.
- Enter
0as the Minimum and1as the Maximum. - Enter
0.001as the Step. - When you finish, click OK.

Open the attribute table of the layer. You can now use the up and down arrows to enter values one step at a time. You can also see that you cannot enter a value beyond the minimum and maximum.
Create an attachment field
An attachment field associates files such as photos with each feature. In QGIS, you store the file path in a text field, which links the field smoothly to an external file.

Add a text column for file attachments
The following example adds a field (flag) for flag image files to the world's countries layer. Assume that the flag image files are stored in a flags directory inside the project folder.

Next, create a field in QGIS that has the attachment function. First, switch the layer to edit mode and add a Text (string) column.

Set up an attachment in the attribute form
Open the attribute form from Layer Properties and do the following.
- In the Fields list on the left, select the
flagfield. - Select Attachment from the Widget Type menu.
- Store path as: sets how the path of the attached file is represented. You can choose Relative to Project Path, Absolute Path, or Relative to Default Path. This example uses Relative to Project Path.
- Type under Integrated Document Viewer: sets the type of the file content, such as image, audio, or video, so you can check the content of the attached file in the attribute table. This example selects Image.
- When you finish, click OK.

Open the attribute table to check. The field now has a ... button for setting an attached image. Select an image file with this button, and the path relative to the project appears as text, along with a preview of the attached image.
Conclusion
This article explained how to set up dropdown lists, checkboxes, numeric ranges, and image attachments in QGIS attribute forms. With these features, you can enter data intuitively and greatly improve the efficiency and accuracy of data editing.
Try them out in your own projects.

QGIS LAB is a comprehensive information hub for QGIS, the open-source GIS software. Under the concept of “Geospatial for Greater Good,” we share the knowledge and skills to open up the world through location data.


