
Layer Management Basics in the Layers Panel
What you'll learn
- Basic operations in the Layers panel
Recommended for
- QGIS beginners who want to learn how to use the Layers panel
- Anyone who wants to control the display order of layers on a QGIS map
- Anyone who wants to remove layers they added in QGIS
- Anyone who wants to manage layers more efficiently
Introduction
The Layers panel in QGIS has many features for managing layers. This article introduces the basic operations in the Layers panel.
Layers panel basics
The Layers panel usually appears at the bottom left of the QGIS window.

If the Layers panel does not appear, click View → Panels in the menu bar and check Layers.

Open layer properties
The Layer Properties dialog lets you check and change detailed information and settings for each layer. It covers many tasks, such as checking layer information and setting styles and labels.
To open the layer properties, select the layer in the Layers panel, right-click it, and select Properties. You can also double-click the layer.

The Layer Properties dialog opens. On its left side, a series of tabs runs from Information to Digitizing.
The Information tab shows various information about the layer, such as the file path and the coordinate reference system (CRS).

The Source tab lets you change the layer's character encoding and CRS settings, and create a spatial index.

The Symbology tab changes how the layer looks on the map. By customizing the layer's color, shape, and size, you can make the map easier to read or visually emphasize the layer.

This article does not cover each tab in detail. A deeper understanding of what each tab does, though, makes map creation and data management more effective.
Show and hide layers
The Layers panel shows all the layers you have added.
Each layer in the panel has a checkbox on its left. Check the box to show the layer, and clear it to hide the layer. In the figure below, only the airport point layer airp_jpn is checked, so the map canvas displays only the airport points.

Show or hide multiple layers at once
You can also show or hide multiple layers at once.
Hold the Shift key, select the layers, and click the Manage Map Themes button (the eye icon) at the top of the Layers panel. Click Show Selected Layers, Hide Selected Layers, or another option (pressing the Space key also works). This shows or hides all the selected layers at once.

Rename a layer
When you add a layer to QGIS, the file name of the vector layer becomes the layer name.
To rename a layer, right-click the layer in the Layers panel and select Rename Layer. You can also select the layer and press the F2 key.

The layer name becomes editable, so enter an appropriate name. Here, the layer airp_jpn is the airport layer, so it is renamed to 空港 (airports).
When you finish typing, press the Enter key to confirm the change.

If you leave the layer names at their defaults, it can be hard to tell what each layer shows in the Layers panel, depending on the file name. It is a good idea to rename layers after adding them.

How layer names relate to file names
Now that you know how to rename a layer, you might worry that the file name changes too. The layer name is only the name QGIS uses to identify the layer within the project, so renaming a layer does not change the original file name.
For example, right-click the renamed layer and select Properties → Information tab. In the General section, the Path field shows the path of the file that stores the layer.
The path shows that the file name has not changed.

Renaming layers helps you organize a project, but it does not affect the original file. Keep that in mind.
Change the display order of layers
In QGIS, you build a map by stacking multiple layers, and a layer higher in the Layers panel covers the layers below it. It is therefore important to manage the layer order to suit your purpose.
For example, if the background map (OpenStreetMap) is above the airport layer (airp_jpn) in the Layers panel, the background map covers the airport point layer and hides it.

In such cases, changing the display order of the layers lets you show the layers you need.
Drag OpenStreetMap in the Layers panel below airp_jpn.
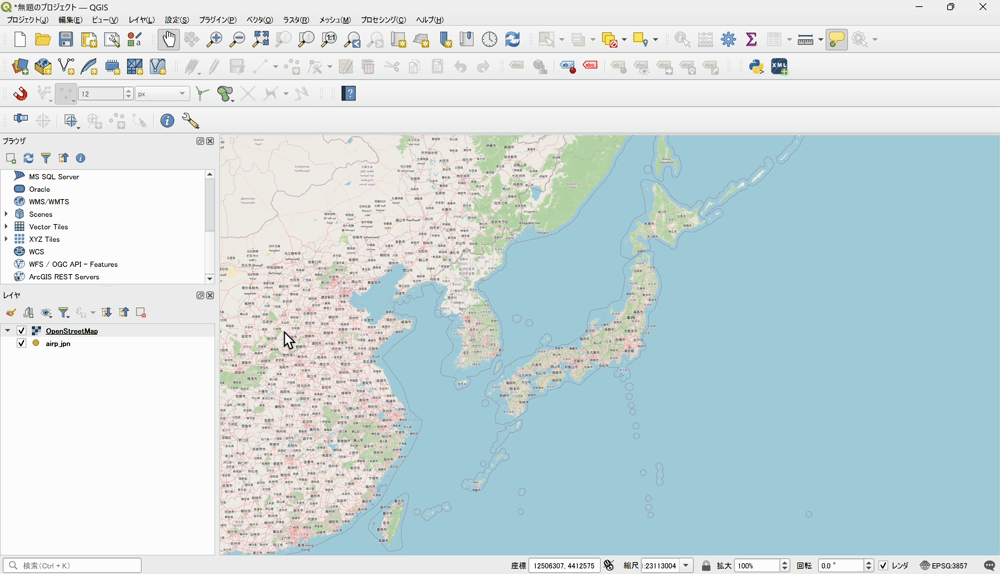
The airport point layer now appears over the OpenStreetMap background.
In this way, change the display order of layers as needed for the map you want to make.
Remove a layer
You also remove layers from the Layers panel. Select the layer you want to remove from QGIS and click the Remove Layer/Group button at the top of the Layers panel. You can also right-click the layer and select Remove Layer.
A message asks “Remove 1 legend entry?” If everything looks right, click OK. This removes the layer from the QGIS project.

When you remove a layer in QGIS, only the layer's reference in the QGIS project is removed. The original file is not deleted.
However, be careful with unsaved layers created temporarily in QGIS (temporary scratch layers). If you remove one without saving it, its data is erased as well.

Group layers
Grouping is a feature that collects multiple layers into a single group for management. When you make maps or manage data, grouping related layers keeps the project organized and makes work more efficient.
In the figure below, the layers 空港 (airports), 道路 (roads), 鉄道 (railways), and フェリー (ferries) have been added as transportation layers. Let's add these layers to a group named 交通 (transportation).
Select the layers, then click the Add Group button at the top of the Layers panel. You can also right-click and select Group Selected. QGIS adds the selected layers to the group and makes the group name editable. Enter 交通.

Grouping layers like this makes the Layers panel easier to read and lets you show or hide layers by group, which makes managing layers easier as their number grows.
Conclusion
This article introduced operations in the Layers panel. You will use all of these features often in QGIS, so remember them!

QGIS LAB is a comprehensive information hub for QGIS, the open-source GIS software. Under the concept of “Geospatial for Greater Good,” we share the knowledge and skills to open up the world through location data.


